Monday, September 7, 2015

It's a Fiesta!

Throwing a fiesta? Here are a few fun ideas I did with my husband's birthday a few weeks ago :)

Our menu was simple:

Enchilada Style Burritos
Watermelon
Salsa Bar with white, yellow and blue tortilla chips, and a variety of salsa
Margarita Station
Corona
Soda Pop/water bottles
Cup Cakes

Decor was simple too:

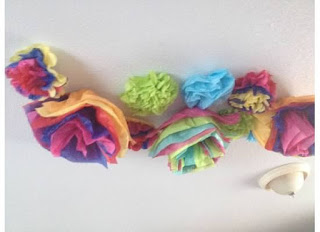
Tissue paper flowers on the ceiling
A beautiful blanket I used as a tablecloth
A pinata

For the watermelon I covered a sombrero with plastic wrap, and lined the brim with the melon.

The salsa bar was fun and simple to put together.  I picked out a variety of mild, medium and hot salsas.  A few different flavors I chose were pineapple, roasted tomato and green chili.


Tissue paper flowers added a nice pop of color :)

The cupcakes turned out really cute.  My sis in law and I arranged them into a fun guitar shape, and decorated with white and black icing.


We had such a great time with all the friends and family that attended.  A special thanks to the musicians that brought their instruments, and played us all music around the fire into the night.  I know this was a birthday my husband won't soon forget :)

Wednesday, September 2, 2015

Glitter Jars

My mother in law and I have been hearing tons about these glitter jars lately.  We decided to make some of our own with the kiddos.  I just love the idea of them as a parenting tool, and even to calm my own nerves from time to time lol.  When you or your little ones are feeling out of sorts or need a minute to calm and process information, just shake the jar and watch the glitter go around and start to settle.  Once the glitter is all settled, you should feel better and more calm to address the issue at hand.
      There are a bunch of tutorials online about glitter jars (time out jars, mind jars, meditation jars and galaxy in a jar)).  We read through a few, then just kind of came up with our own way to make them.  They turned out very pretty :)

First we gathered supplies:
Empty Jars
Glitter Glue
Loose Glitter, different sizes
Glow in the Dark Stars
Charms
Food Coloring
Hot Water

Step 1 - Fill your empty jar one third of the way with hot water.

Step 2 - Add a couple tablespoons of glitter glue, or clear glue with out glitter and stir thoroughly.  It is up to you how much to add.  The more glue you use, the longer it takes the glitter to settle in your ending product.

Step 3 - Now add anything extra, like a drop of food coloring, charms, sequence and more glitter.  This is where you can really customize your jar, and add things you think are pretty :)

Step 4 - Fill the remaining space in the jar with more water until it's an inch from the top.

Step 5 - Secure lid tightly, shake, watch and relax :

Here are a few that we made today.


The kids made some with recycled baby food jars :)


So far they have been working great :)

Here is a video to really show how they look :)

Saturday, January 24, 2015

5 simple ideas to help learn Spanish


We have recently started to try and learn how to speak Spanish as a family.  Together we came up with 5 ideas to help us along in the journey.  They are all very simple, but I can already tell they are making a huge impact on this learning experience :)

1. Change you phone settings to Español.


#2 Label everything in sight!  My younger children are not old enough for the Rosetta Stone program, so I've been looking for ways to get them involved.  We labeled everything from las ventanas (the windows) to the la nevera (the refrigerator), and had a lot of fun doing so.

#3 Watch children shows on television en Español. This seems to help because they often review colors, numbers and just easier vocabulary. I have Plaza Sesamo (Sesame Street) on my DVR.

#4 Listen to music en Español. Sirius has a lot of great stations to choose from.  

#5 Search Pinterest.com! Just type in "Learn Spanish" and a ton of reference pictures come up and helpful websites.
I have screen shot many of these on my phone to keep as a handy references :)


Saturday, January 17, 2015

We're learning Latin-American Spanish!

Hola,
The Charmed Farm Fam is going to try and learn a new language!  Rosetta Stone had a New Year's special on their software programs, more than 1/2 off.

 Here is Rob doing his first lesson :)

Normally the programs cost $499, but they were marked down to $229. Also, we purchased through ebates.com and got another $16 cash back :) The program allows up to 5 users - my hubby, my 10 year old son, my 12 year old daughter, my mother in law and I are all going to try it out. If the program works for us, I want to look into "Rosetta Stone for Kids" for the little ones. If just one of us can pick up a new language, I'd say it was $213 well spent.

Have any of you tried Rosetta Stone programs? Any advice or tips on learning a new language?

I personally took a Spanish class in middle school, high school, even in college and have yet to be fluent. I have picked up more and more along the way, but would not be able to hold a convo.  I think my issue is that I have never immersed myself in the language or culture.  With my family learning together, we can help each other and really have fun with it :) We can study Latin American traditions, eat their cuisine, watch movies together in Spanish and who knows? Maybe when we finish the program we can take a trip! We will let you know how it goes :)

Adiós,
The Charmed Farm

Friday, December 12, 2014

Christmas Wreath Cake

Here is a quick cake idea for a holiday party.  The Christmas wreath adds a festive touch, and using a bundt shape makes serving slices a breeze :) 

All you need is:
-Your favorite cake mix or recipe
-Bundt pan
-Frosting (see below for recipe)
-Green food coloring
-Spinkles & Ribbon

My town has a holiday potluck every year, and so far every time I bring a veggie tray.  This year I decided to go in the other direction and bring cake! 


Here is a link for the frosting I used. It's a basic frosting recipe that I like to use for decorating cakes and cookies :)
http://m.allrecipes.com/recipe/9840/sugar-cookie-frosting/

Friday, October 31, 2014

Thursday, October 30, 2014

Trademark Canopy Review

I received this canopy in the mail the other day, and thought it would be fun to do a review and share it with you.  Maybe it will help any of you that are out canopy shopping online :)  I needed to have a white canopy for future craft show regulations, and this canopy had multiple colors to choose from which was really nice :)


Here is what it looks like straight out of the box.  It weighs about 50lbs so right away I was thankful for the double strapped carrying case.  But what is inside the carrying case?...
 

Instructions, canopy frame and canvas! 3 things, that's it! Nice and simple.  My grandparents used to do craft shows when I was little, and I'm almost positive they had to assemble 50 pieces of metal with bungee cords and everything.
Not only is there only 3 items, there is only 5 steps to set it up :)
  
Step 1: Remove everything from carrying case...Check
Step 2: Stand the tent frame up vertically and unfold the structure about half of its maximum extended distance...Check
Step 3: Place the canopy top over the top of the frame, with each corner of the canopy fitted neatly around the corner pole of the tent structure. 
Side note: There is Velcro attached to keep the corners nicely in place.
 
Step 4: Continue to fold out the tent structure while holding onto the canopy on top.  The frame should extend out easily, though you may have to adjust the canopy as you extend the frame.
Step 5: Lock the canopy into place so it does not collapse and you are good to go!

Side note: I could do everything by myself up until step 4.  I need extra hand to extend the frame, because it kept inching back together.  There was a reviewer on amazon that said after the tent gets broken in a little, it gets easier to set up with one person.  Since I was having problems I enlisted my little ones for help :)
  
That didn't work so I had to bring out the big guns :)
We did it!!!
All in all I love this canopy, and I'm so excited to use it this weekend at the balloon regatta.  I come back and tell you all how it worked out.  I live in a very windy area, so it should be easy to spot any durability issues.  I did notice when the legs were fully extended it felt a little wobbly.  To fix the wobbliness I just took the legs down a notch and it felt much more secure.